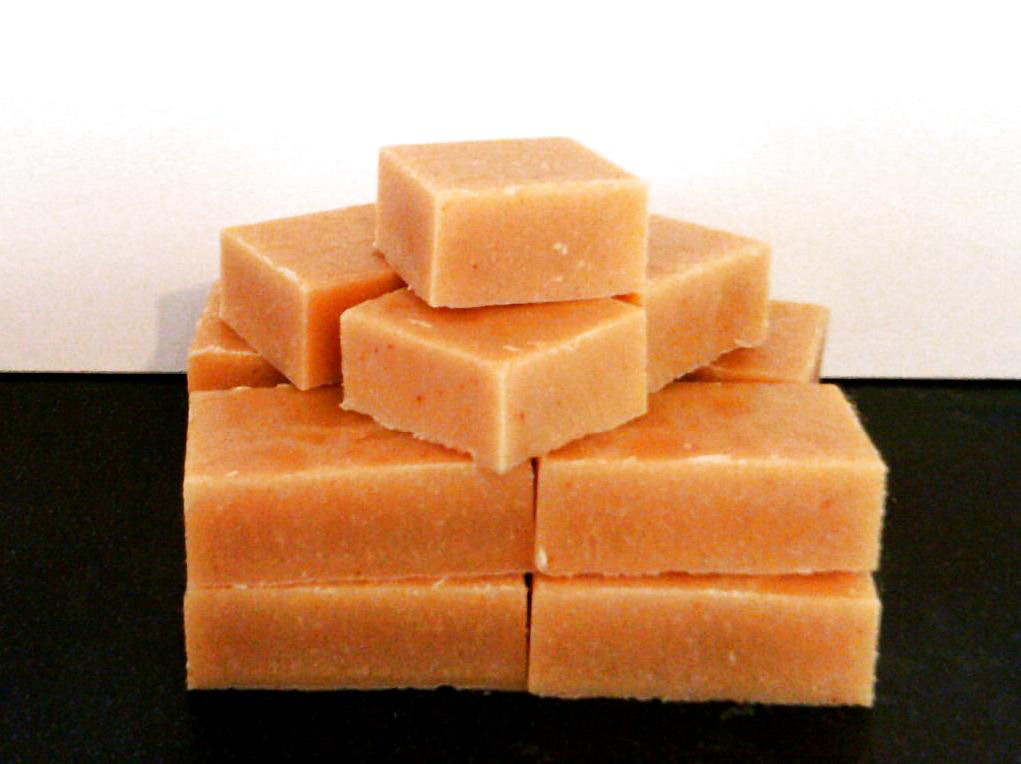
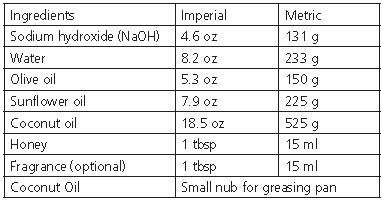
Making honey soap can be an enjoyable hobby and does not need to involve waiting weeks or even months of curing time before you use the soap. The recipe below has been formulated for BeeCraft using oils you should be able to source with little trouble.
Soap making is not difficult using the following method; you do not need any special equipment and can use your honey soap the day you make it. Why not try making some today?
Ingredients
Soap is made with two ingredients: triglycerides and alkali. Triglycerides come in the form of plant oils, animal fats and waxes. Traditionally, animal fats such as lard and tallow were used. Today, soap makers use a variety of oils including olive, sunfl ower and coconut . The second ingredient required is hydroxide. Sodium hydroxide (also called caustic soda) is used when making hard bars of soap. Hydroxide reacts chemically with oil, fat or wax to produce soap.
The qualities of the soap will vary when different oils are used in the formula. Olive and sunfl ower oils make the following soap recipe moisturising, while coconut oil gives it a rich lather. Olive and sunfl ower are available at most grocery stores. Coconut oil can be purchased at Asian shops. Sodium hydroxide is available at some high street chemists.
This simple recipe produces a naturally emollient, unscented honey soap. Additional ingredients can be added to make different varieties. Add colour, fragrance, botanicals or bee products to make your own unique soap.
Saponification
 The chemical reaction that synthesises soap from oils, fats and waxes is called saponifi cation. Sodium hydroxide (NaOH) is used to make cold-processed soap. Mixing triglycerides with hydroxide results in two products: soap and glycerine. Soap recipes are formulated according to this chemical reaction and the saponifi cation values of the oils used. triglycerides + hydroxide soap + glycerine
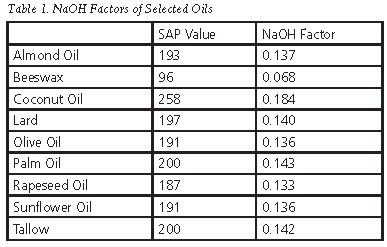
The Saponification Value
The saponification value (SAP value), is technically defined as the milligrams of potassium hydroxide (KOH) required to saponify one gram of a specific oil. The SAP value differs for each plant oil, animal fat and wax and must be determined empirically. This is done experimentally by reacting the oil with potassium hydroxide to determine the number of milligrams required to convert one gram of that oil to soap. As mentioned above, when making cold-processed soaps, we use sodium hydroxide instead of potassium hydroxide. Additionally, most soap makers work in grams rather than milligrams so it makes sense to convert the amount of hydroxide needed into grams.
The SAP value can be used to calculate the NaOH factor which used to formulate a soap recipe, using sodium hydroxide, in grams. Table 1 lists the SAP values and corresponding NaOH factor for a variety of oils used. Note the variation in the amount of sodium hydroxide required to convert different sources of triglycerides to soap. Coconut oil requires the most hydroxide while beeswax requires the least.
Formulating Soap Recipes
Soap recipes are formulated using the empirically determined SAP value for each oil. Because these vary for different oils, it is important to understand that you cannot substitute one oil for another unless the SAP value is the same. Substituting an oil with a lower SAP value for one with a higher SAP value in a recipe will result in an excess of sodium hydroxide in the soap. This would have a high pH (acidity value) and not be safe to use.
The NaOH value of each oil in a recipe can be used to determine the amount of hydroxide needed to convert oil to soap. For instance, if you use 100 grams of olive oil you will need 100 grams x NaOH factor 0.136 = 13.6 grams of sodium hydroxide. This calculation is carried out for every oil used in a recipe. The values are then added together to determine the amount of hydroxide necessary to convert all the oil in a recipe to soap. Recipes rarely use the total amount of hydroxide found by this calculation. After calculating the amount of hydroxide required, this is decreased by a percentage to leave a specifi c amount of oil unreacted. The amount of excess oil in a recipe is known as super-fatting. Soap recipes are often super-fatted leaving 5%, 10% or even more unsaponifi ed oil in the fi nished soap.
No-cure Method
Traditional cold-processed soap requires curing for a month or more before it can be used. While it is curing, its pH drops as the chemical reaction goes to completion and the excess water evaporates, making the bar of soap hard.
The soap-making process can be speeded up by decreasing the amount of water in the recipe, eliminating the need to cure. After a recipe is formulated, the sodium hydroxide is dissolved in water to make a lye solution. The rate of the saponifi cation reaction increases as the concentration of sodium hydroxide increases. By decreasing the amount of water (using the same amount of sodium hydroxide), the chemical reaction goes more quickly, going to completion in a day rather than a month. The measureable pH of the soap decreases to a safe level (approximately pH 10) and the soap is hard the day it is made.
Equipment
 There are two essential pieces of equipment needed to make soap: a scale and a hand blender. Most people have kitchen scales. Ideally, this should measure in increments of one gram. A hand blender is also necessary to mix the lye and the oils thoroughly and quickly. Other equipment includes: a glass bowl, a Pyrex measuring jug, a wooden spoon, cling fi lm, rubber gloves and towels.
Most of these items you will have in your home. You may wish to dedicate some of these items solely for soap making. For instance, the wooden spoon will degrade after a few uses to mix the lye and would not be appropriate for kitchen use. Also, if you are going to use anything plastic, it may retain the fragrance of the soap and so would not be suitable for food.
Making Soap
Before you begin, gather all the ingredients and equipment you will need (see Figure 1). Many traditional cold-processed soap recipes require the lye solution and oil mixture to be warmed to a specifi c temperature but this is not required here.
Making the Lye Solution
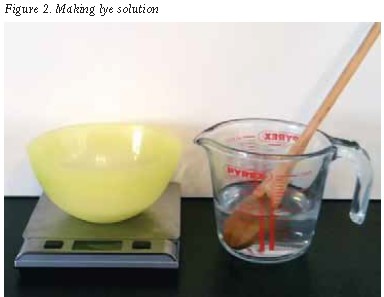 Begin by preparing the sodium hydroxide solution following all safety advice on the caustic soda bottle. Put on your gloves before you begin.
• Place the Pyrex jug on the scale and weigh the water into it.
• Place the small plastic or glass bowl on the scale and carefully weigh the sodium hydroxide into the bowl.
• Add the solid to the water, stirring with a wooden spoon until the crystals are suspended in the water. The solution will warm up as the sodium hydroxide dissolves into the water.
• Once the sodium hydroxide is suspended in the water, remove the spoon and put the jug to the side, out of reach. There is no need to continue to stir until the crystals are dissolved.
*Do not inhale the fumes and make sure the lye solution is out of reach of children and pets
Measuring the Oils
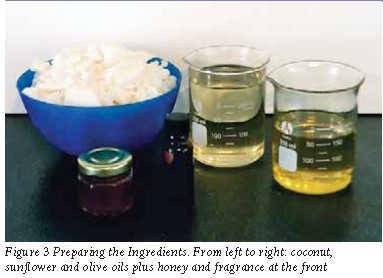 Measure all the oils by weight (see Figure 3). Gather the other ingredients required including honey and fragrance if you wish.
• Heat the coconut oil until the oil has melted. Transfer the glass bowl with the solid coconut oil to the microwave or bain-marie and heat just until the oil has melted.
• Weigh the olive and sunflower oils into the bowl containing the melted coconut oil.
• Add the fragrance (optional), honey and other ingredients, such as colour, fragrance or botanicals, to the oil and stir.
Making the Soap
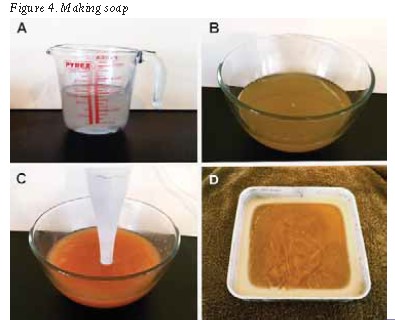 The stages in the soapmaking process are illustrated in Figure 4.
• Carefully pour the lye solution (A) into the oil mixture (B) so that saponifi cation can begin. Stir slowly with the hand blender turned off.
• After you have added all the lye, start mixing with hand blender turned on (C).
• The soap mixture will become more opaque and begin to thicken. It will change to a golden colour.
• Stir until the soap mixture is like a cake batter.
• Pour it into a greased pan.
• Wrap the pan with cling fi lm and cover it with layers of towels to prevent heat loss.
• As the chemical reaction produces heat, the saponifi cation reaction will convert the oil and hydroxide into soap and glycerine. You will see the soap gelling from the centre to the edge of the tray (4D).
• When the soap has completed processing and the gel has reached the edges of the tray, unwrap it and leave it to cool.
• Remove the soap from the tray when it is solid. Sometimes it is reluctant to release from the bottom. Placing the tray in the freezer for a moment can help this.
• Cut the soap into pieces while it is slightly warm and leave to cool.
Give it a Go
 Now that your bees are tucked in for the winter why not make some honey soap? Experiment by adding different honey and fragrance combinations to make different varieties. If you enjoy making honey soaps and are interested in selling them, you will need to comply with the legislation regulating the sales of cosmetics in the United Kingdom.
Dr Sara Robb is an awardwinning scientist, professional speaker, author and managing director of her company Bath Potions. She grew up in Iowa, USA, and studied at Iowa State University, the Philadelphia College of Pharmacy and Science and Hershey Medical School for her PhD where she focused on aging and the role of oxidative stress in the process. In 2003, She left academic research and founded Bath Potions which specialises in honey soaps and beeswax creams. Sara has a continued interest in aging and antioxidants, particularly, those in bee products.
Contact: Dr Sara Robb
[email protected]
www.CPSR.buzz
REFERENCES
Robb, SJ (2009). Dr Sara’s Honey Potions. Northern Bee Books. Robb, SJ (2012). Beauty and the Bees. Northern Bee Books.
November, 2013