It is always important to make sure you have enough frames for the coming season. Each year I buy a quantity of new frames, but I also try to recycle used ones where possible. Recycling frames saves money, reclaims old wax and, with the system I use, can also be used to clean any supers or brood boxes that could do with a bit of attention.
Is it Worth it?
One question to ask before thinking about recycling frames is whether it is worth your while. The process is messy and quite time consuming. If you have just one or two colonies you might not consider it viable. In my case, I might clean and recycle around 150 frames a year. This represents quite a saving when it comes to buying new frames. In addition, the recovered wax is used in part-exchange when buying new foundation. If you have only a few frames to clean it might be worth holding a session with a beekeeping friend or as an association. This allows you to share the work and have a good chat about beekeeping at the same time.
When to Clean
Ideally, frames should be cleaned as soon as possible after they have been removed from the hive. However, frames tend to be removed from service piecemeal throughout the season, so it makes sense to save them until there are enough to make it worth having a cleaning session.
 In the meantime, they should be stored in plastic bee-proof containers, or in well-sealed supers and brood boxes. I check them periodically to make sure there is no wax moth infestation, although a small amount of damage isn’t the end of the world as the comb isn’t going to be re-used.
If I am worried about moths, I will fumigate stored combs with 80% acetic acid.
The need for clean frames means I usually end up processing one batch in the spring and another in the summer. However, I try to keep the bulk until winter because the job is very much easier to do when it is cold.
In warm weather, thousands of bees will be attracted by the melting wax and honey. This poses a potential health threat to the bees and makes working conditions quite unpleasant.
The Equipment
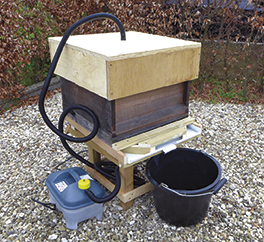
I clean my frames using a simple home-made steam system. Commercially designed versions are available but they are quite expensive and, as far as I can see, aren’t any more effective.
My kit was put together quickly and cheaply. It consists of a roof, which allows steam to enter at the top, and a tray to catch molten wax and allow it to drain into a bucket at the bottom. Between the two goes a brood box or super that is in need of a good internal clean. The steam comes from a domestic wallpaper steamer. These can be purchased for about £30.
The roof was made out of scrap 25 mm exterior plywood and is of very basic construction. The size is not very important, as long as it fits snugly and does not allow steam to escape. There is a hole in the centre to fit the pipe from the steamer.
The tray was slightly more complicated to make because it needed to fit a National box snugly.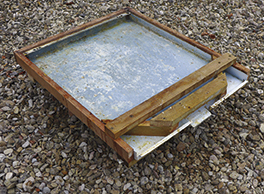 Again, it was made of scrap wood. My first attempt had a simple plywood floor which allowed molten wax to drain away reasonably well. However, I found that the wax sometimes solidified on the cold floor, which stopped further wax from flowing out and caused blockages. I then lined the plywood base with ordinary kitchen tin foil. This worked well because the foil heated up quickly and kept the molten wax flowing.
I now have a deluxe floor made from the front panel of an old central heating boiler that I spotted in a skip. Luckily, the panel was almost exactly the right size and only minor modifications were needed for it to fit my existing design.
A floor could have a built-in gradient to ensure molten wax drains away quickly, but I simply prop mine up with a couple of bits of wood at the back.
The other essential part of the set-up is a sheet of varroa mesh which sits above the tray, just beneath the frames. Molten wax drips through the mesh and the majority of the dirt, particularly the old cocoons from brood frames, is filtered out.
The whole thing sits on a hive stand when in use, giving enough height to place a bucket at the front to catch the wax.
The Process
Before steaming starts, I sort out which frames are worth saving. Seriously broken or warped frames have their wax cut out and the frames are discarded. Some frames might be in good condition apart from a broken top- or side-bar and these are cleaned along with everything else and then used for spare parts. If it is obvious that a frame has been recycled once or twice before, it probably won’t make the grade.
If I am at all unsure about the provenance of any frames or the health of the colony they came from, both frames and wax will be burnt. I see no point in taking any risks.
The frames to be cleaned are placed in a brood box or super and this is placed over the tray. Any comb that I have cut out of unsalvageable frames is poked between the frames. The roof is placed 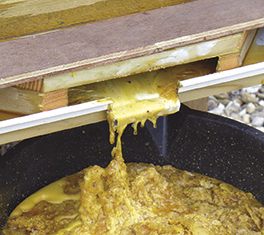 on the top, the pipe from the steamer pushed into the hole, and the steamer is switched on.
It takes about 10 minutes for enough steam to build-up inside the box to start melting the wax, but once melting begins the molten wax will flow into the bucket quite rapidly. It takes about a further 20 minutes before the flow of wax stops.
Leaving the steamer on so that the frames remain hot, and being careful to avoid the steam, I lift 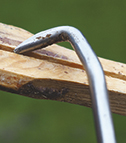 the lid and remove one frame at a time. Working quickly, I use a hive tool to scrape any remaining wax, cocoons or propolis from the frame. The top wedge is levered away from the frame, which releases the wiring from the foundation. Pliers are used to remove the nails from the wedge. The last parts of the frame to be cleaned are the grooves in the side bars which are sometimes clogged with propolis. The best tool for this is a specially made frame cleaner that has a ‘swan’ neck which is angled to get into the grooves.
The cleaned frame is then put in a large plastic container in which there is a strong solution of soda crystals in hot water. This will dissolve any remaining propolis and further disinfect the frames. I then move on to the next frame.
Once frames have soaked in the soda solution for about five minutes, I scrub them with wire wool to remove any stubborn dirt and propolis. The frames are then rinsed in another container of cold water before being removed to dry.
Final Jobs
Once all of the cleaned frames have been dealt with, I switch off the steamer and scrape out the inside of the box. This will also be scrubbed with soda solution and possibly flamed when dry.
The next job is to scrape the remaining wax and cocoons from the varroa mesh floor so that it is ready to use again. Another box and more frames can then be added for the next steaming session.
Finally, all the cleaned frames are sorted to remove anything that has broken during the process. 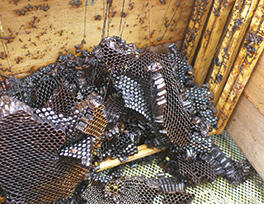 That will be added to the removed cocoons and the already rejected frames and burnt before any bees have a chance to find it. It always produces a very good bonfire.
Once frames are dry, they can be fully inspected and reassembled before being stored ready for use.
It’s always very satisfying to use good quality recycled frames knowing that the wood has been made to last a bit longer and that I have saved some money, both by avoiding the purchase of new frames and in trading-in the salvaged wax for new foundation.
Written by Richard Rickitt | Appears in the February 2018 Edition of Bee Craft Magazine


